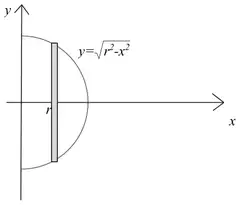
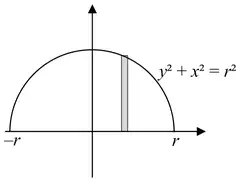
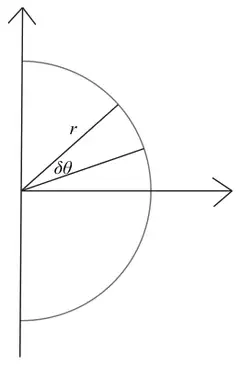
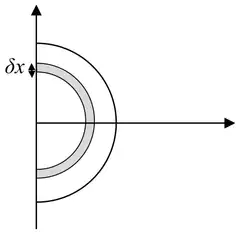
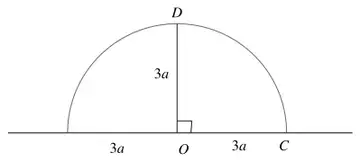
6. A uniform semicircular lamina has radius \(r\) and the midpoint of the diameter of the lamina is at \(O\). The distance of the centre of mass of the lamina from \(O\) is \(d\).
(a) Use algebraic integration to show that \(d = \dfrac{4r}{3\pi}\) (4)
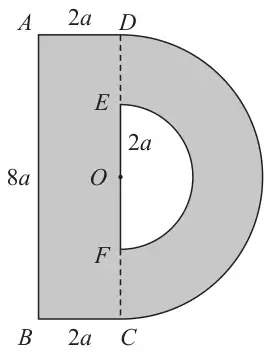
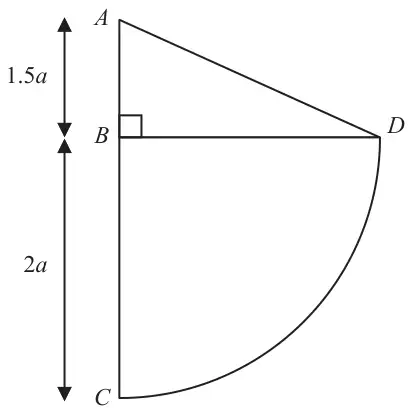
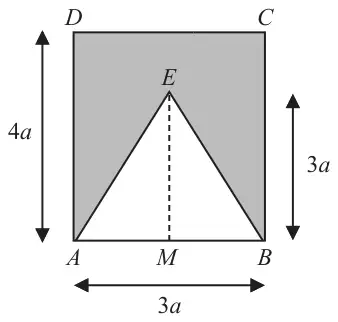
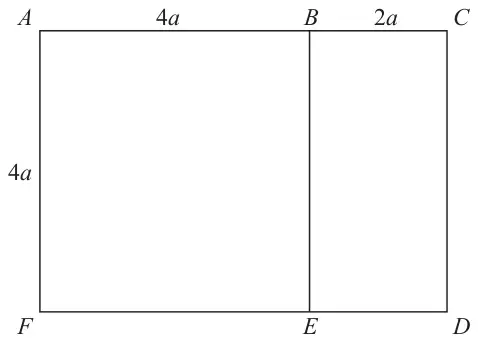
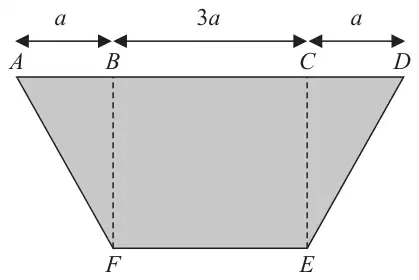
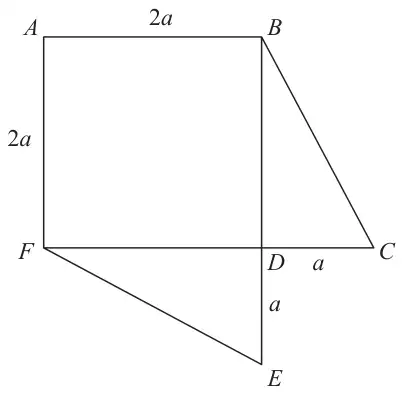
The uniform plane template \(T\), shown shaded in Figure 7, is formed from a rectangle and a semicircular ring. The rectangle has \(AD = BC = 2a\) and \(AB = DC = 8a\). The midpoint of \(CD\) is \(O\). The semicircular ring has centre \(O\), outer radius \(OD = 4a\) and inner radius \(OE = 2a\). The template is modelled as a uniform lamina.
Figure 7
(b) Show that the distance of the centre of mass of \(T\) from \(DC\) is \(\dfrac{32a}{3(8 + 3\pi)}\) (5)
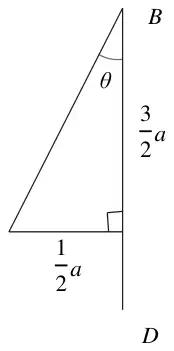
The template is freely suspended from \(A\). The weight of \(T\) is \(W\) newtons. A horizontal force is applied to \(T\) at \(B\) so that \(T\) is held in equilibrium with \(AB\) vertical. The force acts in the same vertical plane as \(T\) and has magnitude \(\lambda W\) newtons.
(c) Find the value of \(\lambda\) (3)
Mark scheme (a)
Scheme
Marks
AO
\(\left(\dfrac{1}{2}\pi r^2 d =\right) \displaystyle\int_0^r 2yx\,\mathrm{d}x\) OR \(\left(\dfrac{1}{2}\pi r^2 d =\right) \displaystyle\int_{-r}^r \dfrac{1}{2}y^2\,\mathrm{d}x\)
\(\Rightarrow d = \dfrac{\frac{2}{3}r^3}{\frac{1}{2}\pi r^2} = \dfrac{4r}{3\pi}\) *
A1*
2.2a
(4)
Notes
M1: Correct strategy to find \(d\) by integration
M1: Integrate a function of the form \(\lambda x\sqrt{r^2 - x^2}\) / \(\lambda\left(r^2 - x^2\right)\). Allow without limits.
A1ft: Follow their \(\lambda\). Allow without limits.
A1*: Obtain given answer including “\(d =\)” from correct exact working
(a) alt M1: Correct strategy to find \(d\) by integration
M1: Integrate a function of the form \(\lambda r^3\cos\theta\) or \(\lambda x^2\). Allow without limits.
A1ft: Follow their \(\lambda\)
A1: Obtain given answer including “\(d =\)” from correct working
Alternative (a)
Scheme
Marks
AO
CoM of “triangle” is \(\dfrac{2}{3}r\cos\theta\) from \(O\) OR CoM of “arc” is \(\dfrac{2x}{\pi}\) from \(O\)
M1
2.1
\(\displaystyle\int_{-\frac{\pi}{2}}^{\frac{\pi}{2}} \dfrac{1}{2}r^2 \times \dfrac{2}{3}r\cos\theta\,\mathrm{d}\theta\) OR \(\displaystyle\int_0^r \pi x \times \dfrac{2x}{\pi}\,\mathrm{d}x\)
M1
3.1a
\(= \dfrac{1}{3}r^3\Big[\sin\theta\Big]_{-\frac{\pi}{2}}^{\frac{\pi}{2}} = \dfrac{2}{3}r^3\) OR \(= \left[\dfrac{2}{3}x^3\right]_0^r = \dfrac{2}{3}r^3\)
A1ft
1.1b
\(\Rightarrow d = \dfrac{\frac{2}{3}r^3}{\frac{1}{2}\pi r^2} = \dfrac{4r}{3\pi}\) *
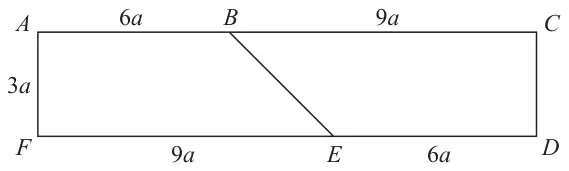
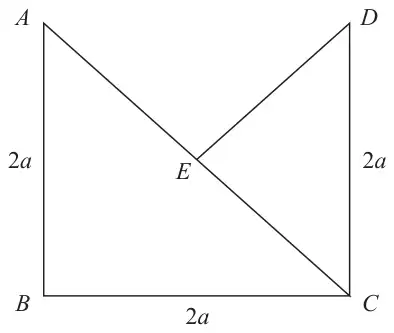
The uniform rectangular lamina \(ACDF\) shown in Figure 5 has \(AC = FD = 15a\) and \(AF = CD = 3a\). The point \(B\) on \(AC\) is such that \(AB = 6a\). The point \(E\) on \(FD\) is such that \(ED = 6a\).
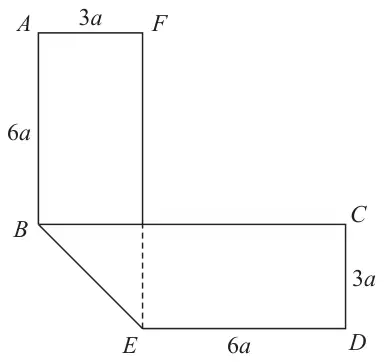
Figure 6
The rectangular lamina is folded along \(BE\) to form the folded lamina shown in Figure 6. The folded lamina has \(AB\) perpendicular to \(BC\) and the two sections, \(ABEF\) and \(BEDC\), of the lamina lie in the same plane.
(a) Show that the distance of the centre of mass of the folded lamina from \(EF\) is \(\dfrac{2}{5}a\). (5)
(b) Explain why the centre of mass of the folded lamina lies on the perpendicular bisector of \(BE\). (1)
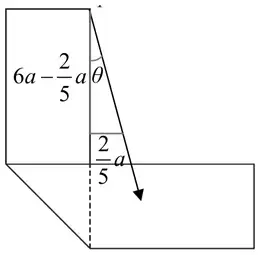
The folded lamina is freely suspended from \(F\) and hangs in equilibrium.
(c) Find the size of the angle between \(FE\) and the downward vertical. (3)
B1: Correct vertical distance using symmetry or a second moments equation
M1: Use of trig to find a relevant angle. Must be dimensionally correct. Award if using an incorrectly evaluated vertical distance of the form \(6a \pm \bar{y}\), where \(\bar{y} = \dfrac{2a}{5}\) or is calculated from a moments equation.
A1: Correct only. \(4.1^\circ\) or better (4.08561678…)
M1: Correct expression using either trigonometry or Pythagoras’: \(\sqrt{2 \times \text{“distance”}^2} = \dfrac{2a\sin\frac{\pi}{4}}{\frac{\pi}{4}}\) leading to “distance” = …
A1*: Correct given answer correctly obtained. Condone \(\dfrac{4}{\pi}a\).
Mark scheme (b)
Scheme
Marks
AO
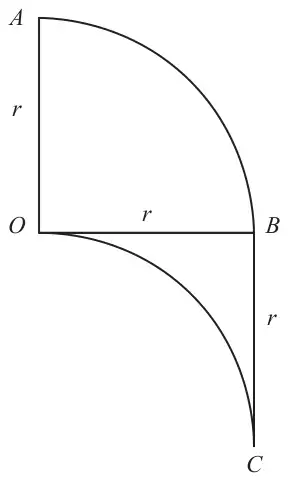
\(AD\) \(BD\) Arc \(CD\) framework
\(2.5a\) \(2a\) \(\pi a\) \(8a + \pi a\)
B1
1.2
Moments about \(AC\)
M1
3.1a
\(2.5a \times a + 2a \times a + \pi a \times \dfrac{4a}{\pi} = (8a + \pi a)\bar{x}\)
A1
1.1b
\(\bar{x} = \dfrac{17a}{2(8+\pi)}\) *
A1*
2.2a
(4)
Notes
B1: Any equivalent ratios
M1: Or moments about a parallel axis (distances consistent with framework not lamina). Allow consistently cancelled \(a\). Must have the correct number of terms.
A1: Correct unsimplified equation for their axis
A1*: Correct given answer correctly obtained. Condone \(\dfrac{17a}{2(\pi+8)}\)
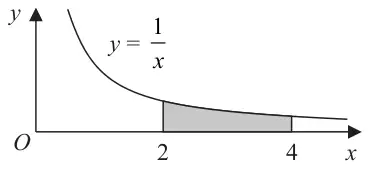
The shaded region shown in Figure 2 is bounded by the curve with equation \(y = \dfrac{1}{x}\), the line with equation \(x = 2\), the line with equation \(x = 4\), and the \(x\)-axis. This region is rotated through \(360^\circ\) about the \(x\)-axis to form a solid.
This solid is used to model a uniform solid pedestal of height 2 m, upper radius 0.5 m and base radius 0.25 m.
Given that the volume of the pedestal is \(\dfrac{\pi}{4}\ \text{m}^3\)
(a) show that the centre of mass of the pedestal is \((4 - 4\ln 2)\) m from its base. (4)
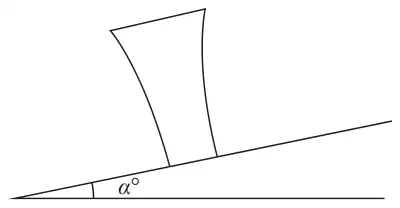
Figure 3
Diagram not drawn to scale
The pedestal is placed on a rough plane that is inclined at an angle \(\alpha^\circ\) to the horizontal. The plane base of the pedestal is in contact with the inclined plane, as shown in Figure 3. The inclined plane is sufficiently rough to prevent the pedestal from sliding.
Given that the pedestal is on the point of toppling,
(b) find the value of \(\alpha\) (3)
Mark scheme (a)
Scheme
Marks
AO
Moments about \(O\): \(\displaystyle\int_2^4 (\pi\rho)\,y^2 x\,\mathrm{d}x\)
\(\dfrac{\pi}{4}d = \pi\ln 2 \quad \Rightarrow d = 4\ln 2\) (distance from base \(=\)) \(4 - 4\ln 2\) *
A1*
1.1b
(4)
Notes
M1: Moments equation to obtain integral of the correct form (with or without limits; condone missing \(\mathrm{d}x\)). Must be integrating \(y^2x\) and not just \(y\). Allow missing volume / \(\rho\) / \(\pi\)
A1: Correct unsimplified integration with correct limits seen (need not be substituted). Allow missing volume / \(\rho\) / \(\pi\)
M1: Complete strategy to find a relevant distance (\(d\) or \(4 - d\)): use of moments equation, correct use of limits, division by volume. Condone calculation of volume.
A1*: Obtain given answer with correct working seen (condone poor integration notation). \(\rho\) / \(\pi\) if seen must be used consistently and correctly.
Mark scheme (b)
Scheme
Marks
AO
Use of trigonometry to find a relevant angle
M1
3.1b
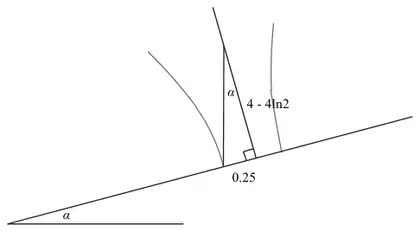
\(\tan\alpha^\circ = \dfrac{0.25}{4 - 4\ln 2}\)
A1
1.1b
\((\alpha =)\ 12\) or better
A1
1.1b
(3)
(7 marks)
Notes
M1: Use of trig to find a relevant angle. Condone use of 0.125 for radius.
A1: Correct unsimplified equation in \(\alpha\). Accept letters other than \(\alpha\).
In this question you must show all stages of your working.
Solutions relying entirely on calculator technology are not acceptable.
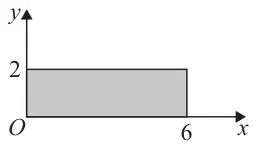
Figure 4
The shaded region, shown in Figure 4, is bounded by the \(x\)-axis, the line with equation \(x = 6\), the line with equation \(y = 2\) and the \(y\)-axis.
This region is rotated through \(360^\circ\) about the \(x\)-axis to form a solid of revolution. This solid is used to model a non-uniform cylinder of height 6 cm and radius 2 cm.
The mass per unit volume of the cylinder at the point \((x, y, z)\) is \(\lambda(x + 2)\ \text{kg cm}^{-3}\), where \(0 \leqslant x \leqslant 6\) and \(\lambda\) is a constant.
(a) Show that the mass of the cylinder is \(120\lambda\pi\) kg. (3)
(b) Show that the centre of mass of the cylinder is 3.6 cm from \(O\). (4)
The point \(O\) is the centre of one end of the cylinder. The point \(A\) is the centre of the other end of the cylinder.
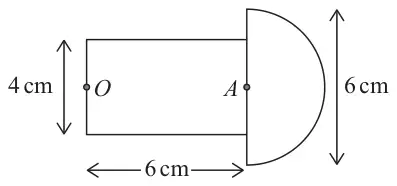
A uniform solid hemisphere of radius 3 cm has density \(\lambda\ \text{kg cm}^{-3}\). The hemisphere is attached to the cylinder with the centre of its circular face in contact with the point \(A\) on the cylinder to form the model shown in Figure 5.
Figure 5
The model is placed with the end containing \(O\) on a rough inclined plane which is inclined at angle \(\alpha^\circ\) to the horizontal. The plane is sufficiently rough to prevent the model from sliding. The model is on the point of toppling.
(c) Find the value of \(\alpha\). (6)
Mark scheme (a)
Scheme
Marks
AO
Mass \(= \displaystyle\int_0^6 \pi 2^2\lambda(x + 2)\,\mathrm{d}x\)
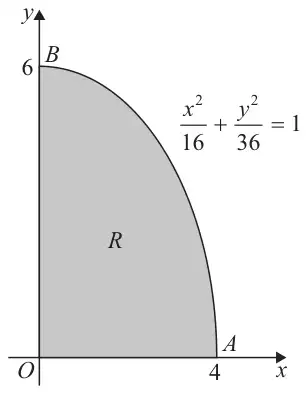
A uniform lamina \(OAB\) is in the shape of the region \(R\). Region \(R\) lies in the first quadrant and is bounded by the curve with equation \(\dfrac{x^2}{16} + \dfrac{y^2}{36} = 1\), the \(x\)-axis, and the \(y\)-axis, as shown shaded in Figure 3.
The point \(A\) is the point of intersection of the curve and the \(x\)-axis. The point \(B\) is the point of intersection of the curve and the \(y\)-axis.
One unit on each axis represents 1 m.
The area of \(R\) is \(6\pi\)
The centre of mass of \(R\) lies at the point with coordinates \((\bar{x}, \bar{y})\)
(a) Use algebraic integration to show that \(\bar{x} = \dfrac{16}{3\pi}\) (5)
(b) Use algebraic integration to find the exact value of \(\bar{y}\) (4)
The lamina is freely suspended from \(A\) and hangs in equilibrium with \(OA\) at angle \(\theta^\circ\) to the downward vertical.
(c) Find the value of \(\theta\) (3)
Mark scheme (a)
Scheme
Marks
AO
Moments about the \(y\)-axis: \(\displaystyle\int (\rho)\,xy\,\mathrm{d}x\)
M1: Correct method for moments about the \(y\)-axis: \(\displaystyle\int (\rho)\,xy\,\mathrm{d}x\) or \(\displaystyle\int (\rho)\dfrac{1}{2}x^2\,\mathrm{d}y\) Integrand should be in one variable only. (corrected from the printed mark scheme, which says “moments about the \(x\)-axis” here)
M1: Integrate to obtain \(k\left(A - Bx^2\right)^{\frac{3}{2}}\) Ignore limits and / or constant of integration
A1: Correct integration with correct limits seen or implied.
DM1: Complete method to obtain \(\bar{x}\). Dependent on first M1.
A1*: Obtain given answer from correct working
Mark scheme (b)
Scheme
Marks
AO
Moments about the \(x\)-axis: \(\displaystyle\int \dfrac{1}{2}y^2(\rho)\,\mathrm{d}x\ \left(= \dfrac{1}{2}(\rho)\int 36 - \dfrac{9x^2}{4}\,\mathrm{d}x\right)\)
M1: Correct method for moments about the \(x\)-axis: \(\displaystyle\int (\rho)\,xy\,\mathrm{d}y\) or \(\displaystyle\int (\rho)\dfrac{1}{2}y^2\,\mathrm{d}x\) (corrected from the printed mark scheme, which says “moments about the \(y\)-axis” here)
A1: Correct integration with correct limits seen or implied.
DM1: Complete method to obtain \(\bar{y}\). Dependent on previous M1.
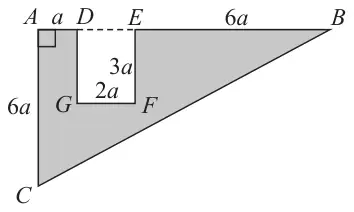
The uniform triangular lamina \(ABC\) has \(AB\) perpendicular to \(AC\), \(AB = 9a\) and \(AC = 6a\). The point \(D\) on \(AB\) is such that \(AD = a\).
The rectangle \(DEFG\), with \(DE = 2a\) and \(EF = 3a\), is removed from the lamina to form the template shown shaded in Figure 3.
The distance of the centre of mass of the template from \(AC\) is \(d\).
(a) Show that \(d = \dfrac{23}{7}a\) (3)
The template is freely suspended from \(A\) and hangs in equilibrium with \(AB\) at an angle \(\theta^\circ\) to the downward vertical through \(A\).
(b) Find the value of \(\theta\) (5)
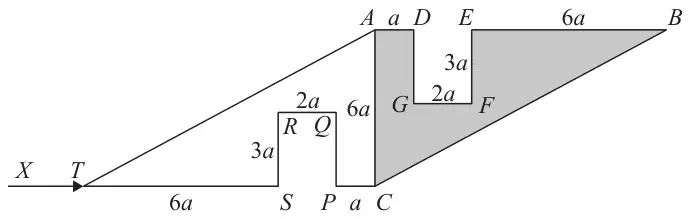
A new piece, of exactly the same size and shape as the template, is cut from a lamina of a different uniform material. The template and the new piece are joined together to form the model shown in Figure 4. Both parts of the model lie in the same plane.
Figure 4
The weight of \(CPQRSTA\) is \(W\)
The weight of \(ADGFEBC\) is \(4W\)
The model is freely suspended from \(A\).
A horizontal force of magnitude \(X\), acting in the same vertical plane as the model, is now applied to the model at \(T\) so that \(AC\) is vertical, as shown in Figure 4.
M1: Take moments about \(AB\) or a parallel axis. Dimensionally correct terms. Correct number of terms.
A1: Correct unsimplified equation
A1: Correct vertical distance. Any equivalent form
M1: Correct use of trig to find a relevant angle
A1: 2 sf or better (33.111…)
Mark scheme (c)
Scheme
Marks
AO
M(\(A\))
M1
3.1a
\(6aX + \dfrac{23}{7}a \times W = \dfrac{23}{7}a \times 4W\)
A1 A1
1.1b 1.1b
\(X = \dfrac{23}{14}W\)
A1
1.1b
(4)
(12 marks)
Notes
M1: Complete method to form an equation in \(X\) e.g by taking moments about \(A\). \(5W\) must be split correctly and equation must be dimensionally correct.
A1: Unsimplified equation with at most one error
A1: Correct unsimplified equation
A1: \(1.6W\) or better \((1.6428\ldots W)\) (corrected from the printed mark scheme: it prints “\(3.1W\) or better \((3.1428\ldots W)\)”, which does not match \(X = \dfrac{23}{14}W\))
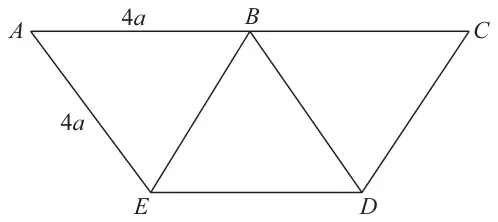
A uniform rod of length \(28a\) is cut into seven identical rods each of length \(4a\). These rods are joined together to form the rigid framework \(ABCDEA\) shown in Figure 1.
All seven rods lie in the same plane.
The distance of the centre of mass of the framework from \(ED\) is \(d\).
(a) Show that \(d = \dfrac{8\sqrt{3}}{7}a\) (4)
The weight of the framework is \(W\).
The framework is freely pivoted about a horizontal axis through \(C\).
The framework is held in equilibrium in a vertical plane, with \(AC\) vertical and \(A\) below \(C\), by a horizontal force that is applied to the framework at \(A\).
The force acts in the same vertical plane as the framework and has magnitude \(F\).
\(32\sqrt{3}a^2 = 28ad \Rightarrow d = \dfrac{8\sqrt{3}}{7}a\) *
A1*
1.1b
(4)
Notes
M1: Dimensionally correct equation with required terms. Accept use of a parallel axis. Accept equivalent mass ratio e.g. \(4a\) replaced by 1
A1: Unsimplified equation with at most one error. Allow distances in terms of \(\sin 60^\circ\) or \(\cos 30^\circ\) or equivalent. N.B. Repeated use of an incorrect distance is only one error.
A1: Correct unsimplified equation. Allow distances in terms of \(\sin 60^\circ\) or \(\cos 30^\circ\) or equivalent
A1*: Obtain given answer from correct working including reference to \(d\).
Mark scheme (b)
Scheme
Marks
AO
Moments about \(C\)
M1
3.1a
\(8a \times F = \left(4a\cos 30^\circ - \dfrac{8\sqrt{3}}{7}a\right) \times W\)
A1
1.1b
\(F = \dfrac{3\sqrt{3}}{28}W\)
A1
1.1b
(3)
(7 marks)
Notes
M1: Dimensionally correct equation with required terms and no extras Equation should be of the form \(\lambda F = (\mu - d)W\)
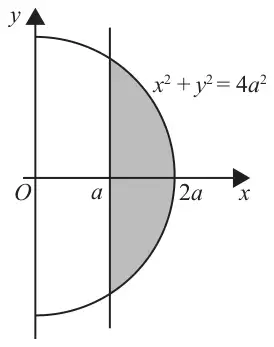
The shaded region shown in Figure 5 is bounded by the line with equation \(x = a\) and the curve with equation \(x^2 + y^2 = 4a^2\)
This shaded region is rotated through \(180^\circ\) about the \(x\)-axis to form a solid of revolution.
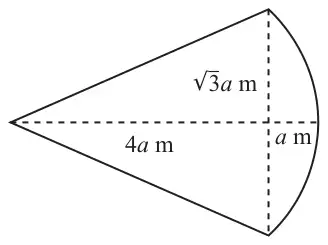
This solid is used to model a dome with height \(a\) metres and base radius \(\sqrt{3}a\) metres.
The dome is modelled as being non-uniform with the mass per unit volume of the dome at the point \((x, y, z)\) equal to \(\dfrac{\lambda}{x^2}\ \text{kg m}^{-3}\), where \(a \leqslant x \leqslant 2a\) and \(\lambda\) is a constant.
(a) Show that the distance of the centre of mass of the dome from the centre of its plane face is \(\left(4\ln 2 - \dfrac{5}{2}\right)a\) metres. (6)
A solid uniform right circular cone has base radius \(\sqrt{3}a\) metres and perpendicular height \(4a\) metres. A toy is formed by attaching the plane surface of the dome to the plane surface of the cone, as shown in Figure 6.
The weight of the cone is \(kW\) and the weight of the dome is \(2W\)
The centre of mass of the toy is a distance \(d\) metres from the plane face of the dome.
(b) Show that \(d = \dfrac{|k + 5 - 8\ln 2|}{2 + k}a\) (4)
The toy is suspended from a point on the circumference of the plane face of the dome and hangs freely in equilibrium with the plane face of the dome at an angle \(\alpha\) to the downward vertical.
Given that \(\tan\alpha = \dfrac{1}{2\sqrt{3}}\)
(c) find the exact value of \(k\). (3)
Mark scheme (a)
Scheme
Marks
AO
Mass of dome \(= \displaystyle\int_a^{2a} \pi y^2\dfrac{\lambda}{x^2}\,\mathrm{d}x = \pi\lambda\int_a^{2a} \dfrac{4a^2 - x^2}{x^2}\,\mathrm{d}x = \pi\lambda\int_a^{2a} \left(\dfrac{4a^2}{x^2} - 1\right)\mathrm{d}x\)
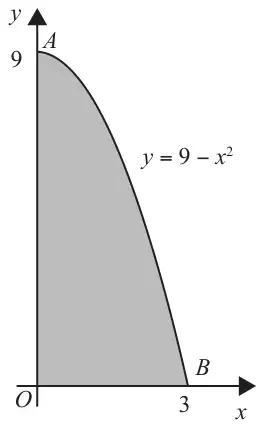
A uniform lamina \(OAB\) is modelled by the finite region bounded by the \(x\)-axis, the \(y\)-axis and the curve with equation \(y = 9 - x^2\), for \(x \geqslant 0\), as shown shaded in Figure 3. The unit of length on both axes is 1 m.
The area of the lamina is \(18\ \text{m}^2\)
(a) Show that the centre of mass of the lamina is 3.6 m from \(\boldsymbol{OB}\).
[ Solutions relying on calculator technology are not acceptable.]
(4)
A light string has one end attached to the lamina at \(O\) and the other end attached to the ceiling. A second light string has one end attached to the lamina at \(A\) and the other end attached to the ceiling. The lamina hangs in equilibrium with the strings vertical and \(OA\) horizontal. The weight of the lamina is \(W\) The tension in the string attached to the lamina at \(A\) is \(\lambda W\)
M1: Complete method to obtain \(\lambda\), e.g. by taking moments about \(O\) or by resolving and taking moments about a different point. Allow for an equation in \(T_A\) or \(\lambda\)
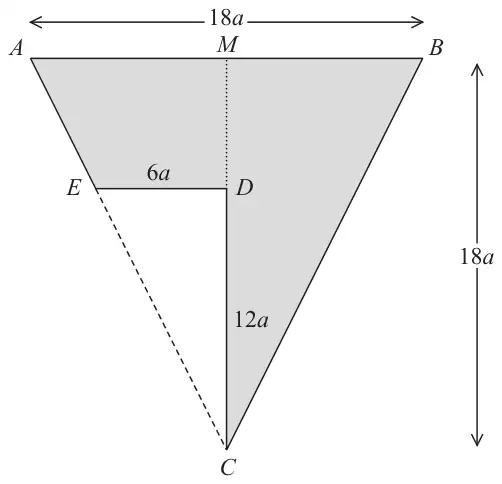
A uniform triangular lamina \(ABC\) is isosceles, with \(AC = BC\). The midpoint of \(AB\) is \(M\). The length of \(AB\) is \(18a\) and the length of \(CM\) is \(18a\).
The triangular lamina \(CDE\), with \(DE = 6a\) and \(CD = 12a\), has \(ED\) parallel to \(AB\) and \(MDC\) is a straight line.
Triangle \(CDE\) is removed from triangle \(ABC\) to form the lamina \(L\), shown shaded in Figure 1.
The distance of the centre of mass of \(L\) from \(MC\) is \(d\).
(a) Show that \(d = \dfrac{4}{7}a\) (4)
The lamina \(L\) is suspended by two light inextensible strings. One string is attached to \(L\) at \(A\) and the other string is attached to \(L\) at \(B\). The lamina hangs in equilibrium in a vertical plane with the strings vertical and \(AB\) horizontal. The weight of \(L\) is \(W\)
(b) Find, in terms of \(W\), the tension in the string attached to \(L\) at \(B\) (3)
The string attached to \(L\) at \(B\) breaks, so that \(L\) is now suspended from \(A\). When \(L\) is hanging in equilibrium in a vertical plane, the angle between \(AB\) and the downward vertical through \(A\) is \(\theta^\circ\)
1. Three particles of masses \(3m\), \(4m\) and \(km\) are positioned at the points with coordinates \((2a, 3a)\), \((a, 5a)\) and \((2\mu a, \mu a)\) respectively, where \(k\) and \(\mu\) are constants.
The centre of mass of the three particles is at the point with coordinates \((2a, 4a)\).
1. Three particles of masses \(4m\), \(2m\) and \(km\) are placed at the points with coordinates \((-3, -1)\), \((6, 1)\) and \((-1, 5)\) respectively.
Given that the centre of mass of the three particles is at the point with coordinates \((\bar{x}, \bar{y})\)
(a) show that \(\bar{x} = \dfrac{-k}{k+6}\) (3)
(b) find \(\bar{y}\) in terms of \(k\). (2)
Given that the centre of mass of the three particles lies on the line with equation \(y = 2x + 3\)
(c) find the value of \(k\). (2)
A fourth particle is placed at the point with coordinates \((\lambda, 4)\).
Given that the centre of mass of the four particles also lies on the line with equation \(y = 2x + 3\)
M1: Correct use of their \(\bar{y}\) and given \(\bar{x}\) to find \(k\).
A1: Correct only
Mark scheme (d)
Scheme
Marks
AO
\(4 = 2\lambda + 3 \Rightarrow\)
M1
3.4
\(\lambda = \dfrac{1}{2}\)
A1
1.1b
(2)
(9 marks)
Notes
M1: Use the model to obtain \(\lambda = \ldots\) or \(x = \ldots\) If working from the beginning and the new particle has mass \(M\) then \(\dfrac{23+4M}{11+M} = 2\left(\dfrac{-5+\lambda M}{11+M}\right) + 3\)
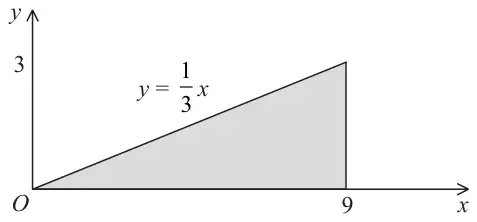
The shaded region shown in Figure 4 is bounded by the \(x\)-axis, the line with equation \(x = 9\) and the line with equation \(y = \dfrac{1}{3}x\). This shaded region is rotated through \(360^\circ\) about the \(x\)-axis to form a solid of revolution. This solid of revolution is used to model a solid right circular cone of height 9 cm and base radius 3 cm.
The cone is non-uniform and the mass per unit volume of the cone at the point \((x, y, z)\) is \(\lambda x\ \text{kg cm}^{-3}\), where \(0 \leqslant x \leqslant 9\) and \(\lambda\) is constant.
(a) Find the distance of the centre of mass of the cone from its vertex. (6)
A toy is made by joining the circular plane face of the cone to the circular plane face of a uniform solid hemisphere of radius 3 cm, so that the centres of the two plane surfaces coincide.
The weight of the cone is \(W\) newtons and the weight of the hemisphere is \(kW\) newtons.
When the toy is placed on a smooth horizontal plane with any point of the curved surface of the hemisphere in contact with the plane, the toy will remain at rest.
(b) Find the value of \(k\) (4)
Mark scheme (a)
Scheme
Marks
AO
Mass of cone \(= \displaystyle\int_0^9 \pi y^2\lambda x\,\mathrm{d}x = \pi\lambda\int_0^9 \dfrac{x^3}{9}\,\mathrm{d}x\)
\(\Rightarrow d = \dfrac{\dfrac{\pi\lambda}{5}\times 9^4}{\dfrac{\pi\lambda}{4}\times 9^3}\)
DM1
2.1
\(d = \dfrac{36}{5} = 7.2\,(\text{cm})\)
A1
1.1b
(6)
Notes
NB: Some candidates are confusing the mass and the volume. For the first M1A1: - If they have a correct method for the mass and they tell you that this is mass, award the marks. - If they have a correct method for the mass say nothing, but use it correctly, award the marks. - If they have a correct method for the mass, say nothing, and use it as the moment, then M0 because this implies that they do not think it is the mass.
M1: Use the model to find the mass of the cone. Allow without limits.
A1: Correct integration. Correct limits seen or implied Substitution not required. Allow 2/2 if π not seen and consistent with (b) if attempted
M1: Use the model to find the moment of the cone (usual rules for integration) Allow without limits
A1: Correct integration. Correct limits seen or implied Substitution not required. Allow 2/2 if π not seen and consistent with (a)
M1: Complete method to find the distance of the centre of mass from the vertex. A complete method requires the two preceding M marks. They need to get as far as a value for \(d\). If they have a method that comes directly to this stage you might not see the \(\lambda\) or \(\pi\)
A1: Correct only If all you see is \(\Rightarrow d = \dfrac{9^5}{45}\div\dfrac{9^4}{36}\) or even \(\Rightarrow d = \dfrac{9}{5}\times 4\) then award 6/6 Allow 6/6 if π not seen throughout but otherwise correct
Mark scheme (b)
Scheme
Marks
AO
Remains at rest \(\Rightarrow\) centre of mass at centre of plane surface
B1: Correct deduction for location of c of m Stated or implied by their moments equation
M1: Moments about diameter of plane face(s) M0 if the moments equation contradicts the centre of mass being on the interface M0 if using volume in place of mass
A1ft: Correct unsimplified equation. Follow their 7.2 Alternative moments equations: Using vertex: \(W\bar{x} + kW\left(9 + \dfrac{3}{8}\times 3\right) = (W + kW)\times 9\) Using base: \(W(12 - \bar{x}) + kW\left(3 - 3\times\dfrac{3}{8}\right) = (W + kW)3\) If they are working with the axis at an angle they will possibly have trig terms which should cancel.
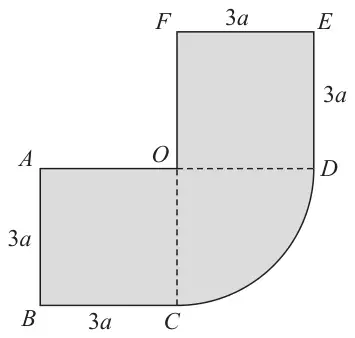
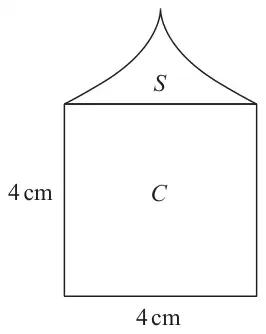
The uniform plane lamina shown in Figure 3 is formed from two squares, \(ABCO\) and \(ODEF\), and a sector \(ODC\) of a circle with centre \(O\). Both squares have sides of length \(3a\) and \(AO\) is perpendicular to \(OF\). The radius of the sector is \(3a\)
[In part (a) you may use, without proof, any of the centre of mass formulae given in the formulae booklet.]
(a) Show that the distance of the centre of mass of the sector \(ODC\) from \(OC\) is \(\dfrac{4a}{\pi}\) (3)
(b) Find the distance of the centre of mass of the lamina from \(FC\) (4)
The lamina is freely suspended from \(F\) and hangs in equilibrium with \(FC\) at an angle \(\theta^\circ\) to the downward vertical.
(c) Find the value of \(\theta\) (4)
Mark scheme (a)
Scheme
Marks
AO
Using sector: distance \(OG = \dfrac{2\times 3a\sin\frac{\pi}{4}}{3\times\frac{\pi}{4}}\)
B1
1.1b
Using Pythagoras: \(2d^2 = \dfrac{32a^2}{\pi^2} \quad \left(d^2 + d^2 = OG^2\right)\) Or using trigonometry: Distance from \(OC = OG\cos 45^\circ = OG\sin 45^\circ\)
B1: Correct application of standard result from formula booklet. Must substitute for \(\alpha\) but need not simplify Implied if you see \(\left(= \dfrac{4\sqrt{2}a}{\pi}\right)\)
M1: Correct strategy to find the distance for the quadrant Need to see use of \(\dfrac{1}{\sqrt{2}}\) or \(\dfrac{\sqrt{2}}{2}\) somewhere in the solution
A1*: Obtain the given result from correct working.
Alternative (a)
Scheme
Marks
AO
Using semicircle of radius \(3a\): \(\bar{y} = \dfrac{4\times 3a}{3\pi}\left(= \dfrac{4a}{\pi}\right)\)
B1
1.1b
Moments about diameter: \(\dfrac{9\pi a^2}{2}\times\dfrac{4a}{\pi} = 2\times\dfrac{9\pi a^2}{4}\times d\)
B1: Correct masses and distance from \(FC\) or a parallel axis or \(BOE\) Seen or implied (a bright candidate might realise that if taking moments about \(FC\) then the two squares cancel each other).
M1: Moments about \(FC\) or a parallel axis or \(BOE\). All terms required, and dimensionally correct. Condone sign errors. Accept as part of a vector equation.
A1: Correct unsimplified equation for their axis
A1: Or equivalent with no errors seen Accept \(0.36a\) or better \((0.3590\ldots a)\)
B1ft: Allow use of symmetry seen or implied. Accept \(\bar{y} = \bar{x}\) (From FE, \(\bar{y} = \dfrac{28a + 3\pi a}{8 + \pi}\)) Accept + / -
M1: Correct strategy to find a relevant angle (\(\theta\) or \(90 - \theta\)) Need to substitute their values of \(\bar{x}\) and distance from \(F \ne \dfrac{4a}{\pi}\).
A1ft: Correct unsimplified expression for a relevant angle. Follow their \(\bar{x}\) and \(\bar{y}\)
A1: 6.1 or better (6.10067…) The question defines \(\theta\) as measured in degrees. 0.106 can score B1M1A1ftA0 Do not ISW
Nine uniform rods are joined together to form the rigid framework \(ABCDEFA\), with \(AB = BC = DF = 3a\), \(BF = CD = DE = 4a\) and \(AF = FE = CF = 5a\), as shown in Figure 1. All nine rods lie in the same plane.
The mass per unit length of each of the rods \(BF\), \(CF\) and \(DF\) is twice the mass per unit length of each of the other six rods.
(a) Find the distance of the centre of mass of the framework from \(AC\) (4)
The mass of the framework is \(M\). A particle of mass \(kM\) is attached to the framework at \(E\) to form a loaded framework.
When the loaded framework is freely suspended from \(F\), it hangs in equilibrium with \(CE\) horizontal.
M1: Dimensionally correct equation for moments about \(AC\) or a parallel axis. All terms needed and horizontal distances Must be using the mass ratio. Allow slips, but not consistently density and not consistently lengths. Condone without \(a\)
A1: One side of the equation correct
A1: Both sides of the equation correct
A1: Or equivalent single term Condone if \(a\) is missing in the working and appears at the end
Mark scheme (b)
Scheme
Marks
AO
Moments about \(F\):
M1
3.1a
\(Mg(4a - \bar{x}) = kMg\times 4a\)
A1ft
1.1b
\(\Rightarrow k = \dfrac{5}{16}\)
A1
1.1b
(3)
(7 marks)
Notes
M1: Dimensionally correct moments equation. Accept any complete alternative method using \(M\) and \(kM\) to obtain an equation in \(k\) only. Condone if g and / or M cancelled throughout Condone incorrect distances Condone if use \(M = 48\) throughout
A1ft: Correct unsimplified equation (accept without \(g\) and/or \(M\)) Correct mass and distance combination for their \(\bar{x}\)
M1: Correct relevant angle (or side if they use the cosine rule) Do not need to evaluate: accept \(\tan\alpha = \ldots\) or \(\alpha = \tan^{-1}\ldots\) (e.g. \(63.4\ldots^\circ\) or \(90^\circ - 63.4\ldots^\circ\))
M1: Another correct relevant angle (or side if they use the cosine rule) Do not need to evaluate: accept \(\tan\beta = \ldots\) or \(\beta = \tan^{-1}\ldots\) (e.g. \(41.68\ldots^\circ\) or \(90^\circ - 41.68\ldots^\circ\))
M1: Correct method for finding the required angle
A1: \(22^\circ\) or better
Mark scheme (c)
Scheme
Marks
AO
Moments about \(OA\)
M1
2.1
\(kMa\sin 45^\circ = M\bar{x}\sin 45^\circ\)
A1
1.1b
\(k = \dfrac{1}{6+\pi}\) \((= 0.10939\ldots)\)
A1
1.1b
(3)
(12 marks)
Notes
M1: Complete method to give an equation in \(k\) only
1. Three particles of masses \(2m\), \(3m\) and \(km\) are placed at the points with coordinates \((3a, 2a)\), \((a, -4a)\) and \((-3a, 4a)\) respectively.
The centre of mass of the three particles lies at the point with coordinates \((\bar{x}, \bar{y})\).
(a)
(i) Find \(\bar{x}\) in terms of \(a\) and \(k\)
(ii) Find \(\bar{y}\) in terms of \(a\) and \(k\) (4)
Given that the distance of the centre of mass of the three particles from the point \((0, 0)\) is \(\dfrac{1}{3}a\)
M1: Moments equation to find \(\bar{x}\) – need all terms and dimensionally correct Allow with \(m\) cancelled throughout Allow if they have a common factor of \(g\)
A1: Correct expression for \(\bar{x}\) Any equivalent form. Allow recovery
M1: Moments equation to find \(\bar{y}\) – need all terms and dimensionally correct Allow with \(m\) cancelled throughout Allow if they have a common factor of \(g\)
A1: Correct expression for \(\bar{y}\) Any equivalent form. Allow recovery
A1*: Correct given answer correctly obtained If they have centre of mass at \((xa, ya)\) then the \(a\) might not be seen in the working. Otherwise, with no \(a\) in the working the maximum score is B1B0M1A0A0
Mark scheme (b)
Scheme
Marks
AO
Moments about \(F\), \(Mg \times \left(3a - \dfrac{11a}{8}\right) = 3aT\)
7. [In this question, you may assume that the centre of mass of a circular arc, radius \(r\), with angle at centre \(2\alpha\), is a distance \(\dfrac{r\sin\alpha}{\alpha}\) from the centre.]
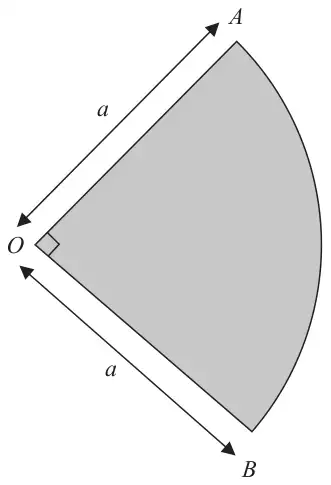
Figure 5
A thin non-uniform metal plate is in the shape of a sector \(OAB\) of a circle with centre \(O\) and radius \(a\). The angle \(AOB = \dfrac{\pi}{2}\), as shown in Figure 5.
The plate is modelled as a non-uniform lamina.
The mass per unit area of the lamina, at any point \(P\) of the lamina, is modelled as \(k(OP)^2\), where \(k = \dfrac{4\lambda}{\pi a^4}\) and \(\lambda\) is a constant.
Using the model,
(a) find the mass of the plate in terms of \(\lambda\), (5)
(b) find, in terms of \(a\), the distance of the centre of mass of the plate from \(O\). (4)
Mark scheme (a)
Scheme
Marks
AO
Use of an appropriate element (quarter of a circle)
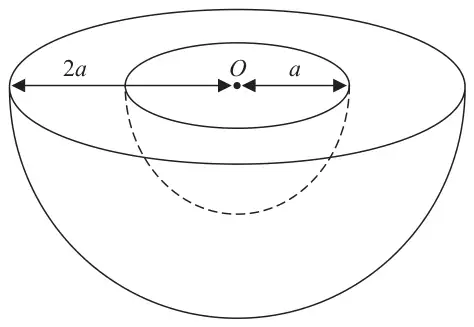
A uniform solid hemisphere \(H\) has radius \(2a\). A solid hemisphere of radius \(a\) is removed from the hemisphere \(H\) to form a bowl. The plane faces of the hemispheres coincide and the centres of the two hemispheres coincide at the point \(O\), as shown in Figure 2.
The centre of mass of the bowl is at the point \(G\).
(a) Show that \(OG = \dfrac{45a}{56}\) (4)
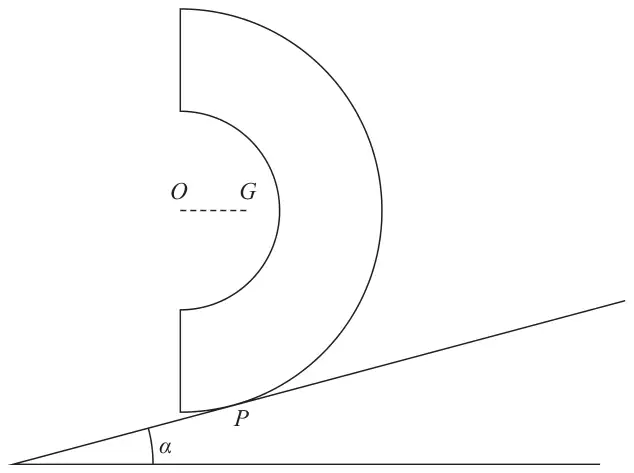
Figure 3 below shows a cross-section of the bowl which is resting in equilibrium with a point \(P\) on its curved surface in contact with a rough plane. The plane is inclined to the horizontal at an angle \(\alpha\) and is sufficiently rough to prevent the bowl from slipping. The line \(OG\) is horizontal and the points \(O\), \(G\) and \(P\) lie in a vertical plane which passes through a line of greatest slope of the inclined plane.
Figure 3
(b) Find the size of \(\alpha\), giving your answer in degrees to 3 significant figures. (2)
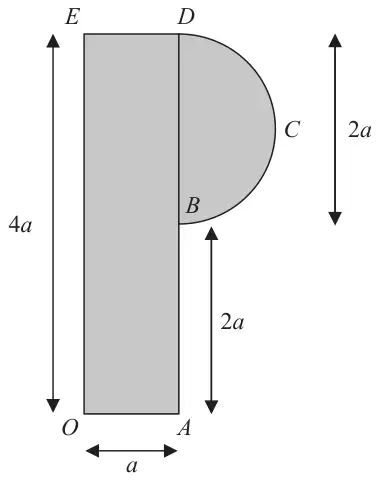
A letter P from a shop sign is modelled as a uniform plane lamina which consists of a rectangular lamina, \(OABDE\), joined to a semicircular lamina, \(BCD\), along its diameter \(BD\).
\(OA = ED = a\), \(AB = 2a\), \(OE = 4a\), and the diameter \(BD = 2a\), as shown in Figure 1.
Using the model,
(a) find, in terms of \(\pi\) and \(a\), the distance of the centre of mass of the letter P, from
(i) \(OE\)
(ii) \(OA\) (6)
The letter P is freely suspended from \(O\) and hangs in equilibrium. The angle between \(OE\) and the downward vertical is \(\alpha\).
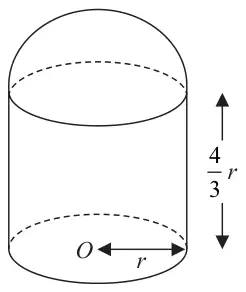
A uniform solid cylinder of base radius \(r\) and height \(\dfrac{4}{3}r\) has the same density as a uniform solid hemisphere of radius \(r\). The plane face of the hemisphere is joined to a plane face of the cylinder to form the composite solid \(S\) shown in Figure 3. The point \(O\) is the centre of the plane face of \(S\).
(a) Show that the distance from \(O\) to the centre of mass of \(S\) is \(\dfrac{73}{72}r\) (4)
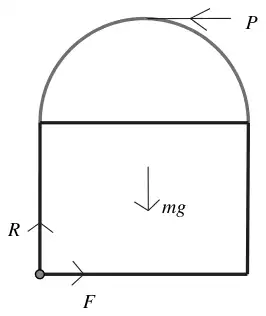
The solid \(S\) is placed with its plane face on a rough horizontal plane. The coefficient of friction between \(S\) and the plane is \(\mu\). A horizontal force \(P\) is applied to the highest point of \(S\). The magnitude of \(P\) is gradually increased.
(b) Find the range of values of \(\mu\) for which \(S\) will slide before it starts to tilt. (5)
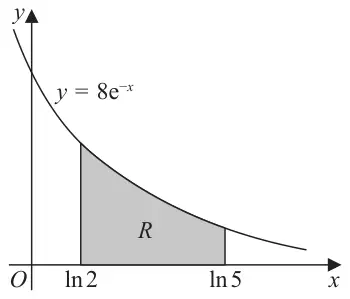
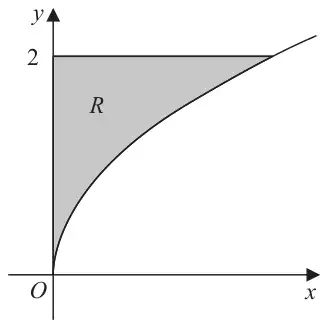
A uniform plane figure \(R\), shown shaded in Figure 1, is bounded by the \(x\)-axis, the line with equation \(x = \ln 5\), the curve with equation \(y = 8\mathrm{e}^{-x}\) and the line with equation \(x = \ln 2\). The unit of length on each axis is one metre.
The area of \(R\) is \(2.4\ \text{m}^2\)
The centre of mass of \(R\) is at the point with coordinates \((\bar{x}, \bar{y})\).
(a) Use algebraic integration to show that \(\bar{y} = 1.4\) (4)
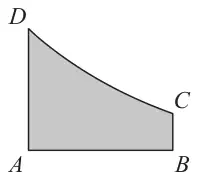
Figure 2 shows a uniform lamina \(ABCD\), which is the same size and shape as \(R\). The lamina is freely suspended from \(C\) and hangs in equilibrium with \(CB\) at an angle \(\theta^\circ\) to the downward vertical.
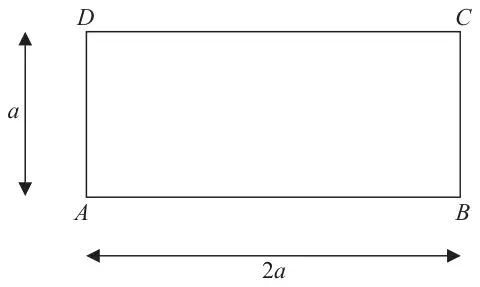
Figure 1 shows a uniform rectangular lamina \(ABCD\) with \(AB = 2a\) and \(AD = a\) The mass of the lamina is \(6m\).
A particle of mass \(2m\) is attached to the lamina at \(A\), a particle of mass \(m\) is attached to the lamina at \(B\) and a particle of mass \(3m\) is attached to the lamina at \(D\), to form a loaded lamina \(L\) of total mass \(12m\).
(a) Write down the distance of the centre of mass of \(L\) from \(AB\). You must give a reason for your answer. (2)
(b) Show that the distance of the centre of mass of \(L\) from \(AD\) is \(\dfrac{2a}{3}\) (3)
A particle of mass \(km\) is now also attached to \(L\) at \(D\) to form a new loaded lamina \(N\).
(c) Show that the distance of the centre of mass of \(N\) from \(AB\) is \(\dfrac{(k+6)a}{(k+12)}\) (4)
When \(N\) is freely suspended from \(A\) and is hanging in equilibrium, the side \(AB\) makes an angle \(\alpha\) with the vertical, where \(\tan\alpha = \dfrac{3}{2}\)
(d) Find the value of \(k\). (6)
Mark scheme (a)
Scheme
Marks
AO
\(\dfrac{1}{2}a\)
B1
1.1b
Loaded lamina has a mass distribution which is symmetrical about the perpendicular bisector of \(AD\)
B1
2.4
(2)
Notes
B1: cao
B1: clear explanation
Mark scheme (b)
Scheme
Marks
AO
Moments about \(AD\)
M1
3.1a
\(6ma + m.2a = 12m\bar{x}\)
A1
1.1b
\(\bar{x} = \dfrac{2a}{3}\) *
A1*
2.2a
(3)
Notes
M1: Correct no. of terms and dimensionally correct (allow cancelled \(m\)’s)
A1: A correct equation
A1*: Correctly obtained printed answer
Mark scheme (c)
Scheme
Marks
AO
Moments about \(AB\)
M1
3.1a
\(kma + 12m.\dfrac{1}{2}a = (k+12)m\bar{y}\)
A1 A1
1.1.b 1.1b
\(\bar{y} = \dfrac{(k+6)a}{(k+12)}\) *
A1*
2.2a
(4)
Notes
M1: Correct no. of terms and dimensionally correct (allow cancelled \(m\)’s)
A1: Correct equation with one error
A1: Correct equation
A1*: Correctly obtained printed answer
Mark scheme (d)
Scheme
Marks
AO
Moments about \(AD\)
M1
3.1a
\(\bar{x}_1 = \dfrac{8a}{(k+12)}\)
A1
1.1b
Use of \(\tan\alpha = \dfrac{\bar{y}}{\bar{x}_1}\)
The region \(R\), shown shaded in Figure 4, is bounded by part of the curve with equation \(y^2 = 2x\), the line with equation \(y = 2\) and the \(y\)-axis. The unit of length on both axes is one centimetre. A uniform solid, \(S\), is formed by rotating \(R\) through 360° about the \(y\)-axis.
Given that the volume of \(S\) is \(\dfrac{8}{5}\pi\ \text{cm}^3\),
(a) show that the centre of mass of \(S\) is \(\dfrac{1}{3}\) cm from its plane face. (4)
A uniform solid cylinder, \(C\), has base radius 2 cm and height 4 cm. The cylinder \(C\) is attached to \(S\) so that the plane face of \(S\) coincides with a plane face of \(C\), to form the paperweight \(P\), shown in Figure 5. The density of the material used to make \(S\) is three times the density of the material used to make \(C\).
Figure 5
The plane face of \(P\) rests in equilibrium on a desk lid that is inclined at an angle \(\theta^\circ\) to the horizontal. The lid is sufficiently rough to prevent \(P\) from slipping. Given that \(P\) is on the point of toppling,
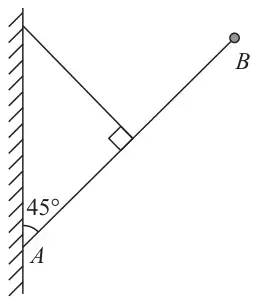
4. A flagpole, \(AB\), is 4 m long. The flagpole is modelled as a non-uniform rod so that, at a distance \(x\) metres from \(A\), the mass per unit length of the flagpole, \(m\ \text{kg m}^{-1}\), is given by \(m = 18 - 3x\).
(a) Show that the mass of the flagpole is 48 kg. (3)
Figure 3
The end \(A\) of the flagpole is fixed to a point on a vertical wall. A cable has one end attached to the midpoint of the flagpole and the other end attached to a point on the wall that is vertically above \(A\). The cable is perpendicular to the flagpole. The flagpole and the cable lie in the same vertical plane that is perpendicular to the wall. A small ball of mass 4 kg is attached to the flagpole at \(B\). The cable holds the flagpole and ball in equilibrium, with the flagpole at 45° to the wall, as shown in Figure 3.
The tension in the cable is \(T\) newtons.
The cable is modelled as a light inextensible string and the ball is modelled as a particle.
(b) Using the model, find the value of \(T\). (8)
(c) Give a reason why the answer to part (b) is not likely to be the true value of \(T\). (1)
Mark scheme (a)
Scheme
Marks
AO
Total mass \(= \displaystyle\int_0^4 (18 - 3x)\,\mathrm{d}x\)
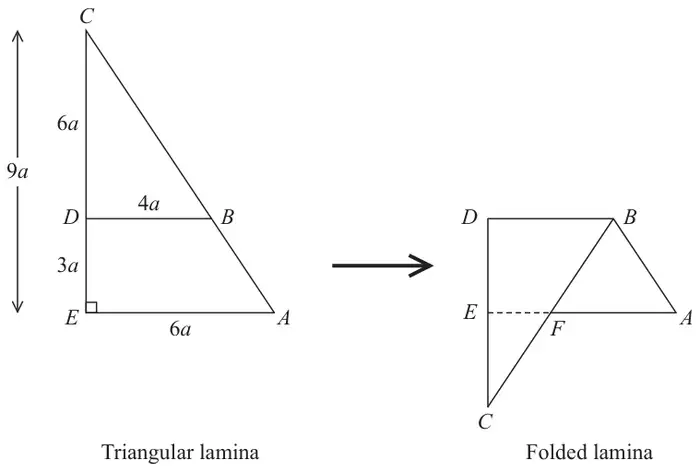
The uniform triangular lamina \(ABCDE\) is such that angle \(CEA = 90^\circ\), \(CE = 9a\) and \(EA = 6a\). The point \(D\) lies on \(CE\), with \(DE = 3a\). The point \(B\) on \(CA\) is such that \(DB\) is parallel to \(EA\) and \(DB = 4a\). The triangular lamina is folded along the line \(DB\) to form the folded lamina \(ABDECF\), as shown in Figure 2.
The distance of the centre of mass of the triangular lamina from \(DC\) is \(d_1\)
The distance of the centre of mass of the folded lamina from \(DC\) is \(d_2\)
(a) Explain why \(d_1 = d_2\) (1)
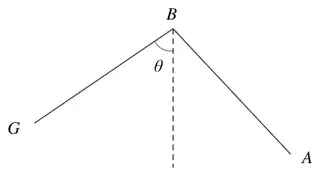
The folded lamina is freely suspended from \(B\) and hangs in equilibrium with \(BA\) inclined at an angle \(\alpha\) to the downward vertical through \(B\).
(b) Find, to the nearest degree, the size of angle \(\alpha\). (9)
Mark scheme (a)
Scheme
Marks
AO
In the folding process, each point of the lamina remains the same distance from \(CD\)
B1
2.4
(1)
Notes
B1: Any equivalent explanation e.g. folding doesn’t change the mass distribution relative to \(CD\). A calculation to verify is not the same as an explanation. Allow use of ‘vertical’ for \(CD\).
Mark scheme (b)
Scheme
Marks
AO
For the folded lamina: \(\bar{x} = 2a\ \ (= d_2)\) oe
3.Numerical (calculator) integration is not acceptable in this question.
Figure 2
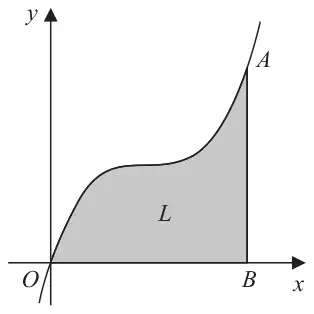
The shaded region \(OAB\) in Figure 2 is bounded by the \(x\)-axis, the line with equation \(x = 4\) and the curve with equation \(y = \dfrac{1}{4}(x - 2)^3 + 2\). The point \(A\) has coordinates \((4, 4)\) and the point \(B\) has coordinates \((4, 0)\).
A uniform lamina \(L\) has the shape of \(OAB\). The unit of length on both axes is one centimetre. The centre of mass of \(L\) is at the point with coordinates \((\bar{x}, \bar{y})\).
Given that the area of \(L\) is \(8\ \text{cm}^2\),
(a) show that \(\bar{y} = \dfrac{8}{7}\) (4)
The lamina is freely suspended from \(A\) and hangs in equilibrium with \(AB\) at an angle \(\theta^\circ\) to the downward vertical.
M1: Complete strategy for \(\bar{y}\): moments equation, use of limits and division by area
M1: Moments equation to obtain terms of the correct form (with or without limits) The integral must be in terms of \(x\) only or \(y\) only Allow if area (8) not seen Might see \(\displaystyle\int \frac{x^6}{16} - \frac{3x^5}{4} + \frac{15x^4}{4} - 9x^3 + 9x^2\,\mathrm{d}x\) Or \(\displaystyle\int xy\,\mathrm{d}y = \int 2y + y\big(4(y - 2)\big)^{\frac{1}{3}}\,\mathrm{d}y\)
A1: Correct unsimplified answer (with or without limits) Allow if area (8) not seen \(\left(\displaystyle\int xy\,\mathrm{d}y = 12.8\right)\)
A1*: Use moments equation and given area to deduce given answer from correct working
M1: Relevant integral in terms of \(x\) only or \(y\) only (with or without limits). Allow if area (8) not seen Could start with \(\displaystyle\int xy\,\mathrm{d}x\) or \(\displaystyle\int \frac{1}{2}x^2\,\mathrm{d}y\) Might see \(\dfrac{x^4}{4} - \dfrac{6x^3}{4} + 3x^2 - 2x + 2x\)
A1: Correct unsimplified form after integration (with or without limits). Allow if area (8) not seen
M1: Complete process to find \(\bar{x}\) following relevant integral
A1: Correct answer
M1: Complete strategy to find \(\theta\) e.g find \(\bar{x}\) and then use trig to find appropriate angle
A1ft: Use the model to find a relevant angle. Follow their \(\bar{x}\)
Five identical uniform rods are joined together to form the rigid framework \(ABCD\) shown in Figure 1. Each rod has weight \(W\) and length \(4a\). The points \(A\), \(B\), \(C\) and \(D\) all lie in the same plane.
The centre of mass of the framework is at the point \(G\).
(a) Explain why \(G\) is the midpoint of \(AC\). (1)
The framework is suspended from the ceiling by two vertical light inextensible strings. One string is attached to the framework at \(A\) and the other string is attached to the framework at \(B\). The framework hangs freely in equilibrium with \(AB\) horizontal.
(b) Find
(i) the tension in the string attached at \(A\),
(ii) the tension in the string attached at \(B\).
(4)
A particle of weight \(kW\) is now attached to the framework at \(D\) and a particle of weight \(2kW\) is now attached to the framework at \(C\). The framework remains in equilibrium with \(AB\) horizontal and the strings vertical.
Either string will break if the tension in it exceeds \(6W\).
(c) Find the greatest possible value of \(k\). (4)
Mark scheme (a)
Scheme
Marks
AO
The rods are uniform and the axes of symmetry intersect at midpoint of \(AC\).
B1
2.4
(1)
Notes
B1: Any equivalent clear justification. Needs to mention uniformity and symmetry and the midpoint of \(AC\)
Mark scheme (b)
Scheme
Marks
AO
Use moments: e.g. M(\(A\)): \(\left(2aW + aW + 3aW = 4aT_B + aW\right)\)
M1
2.1
e.g. M(\(A\)): \(5W.2a\cos 60^\circ = 4aT_B\) or M(\(B\)): \(3a \times 5W = 4aT_A\)
M1: Form ANY moments equation. Require all terms. Dimensionally correct. Condone sign errors.
A1: Correct unsimplified (including trig) equation e.g. M(\(G\)): \(T_A.2a\cos 60^\circ = T_B.(4a - 2a\cos 60^\circ)\) or \(T_B.(4a\cos^2 30^\circ)\)
M1: Form a second equation in \(T_A\) and/or \(T_B\) e.g. by resolving vertically or a second moments equation, and solve for \(T_A\) and \(T_B\)
A1: Both tensions correct. If answers reversed, allow M marks.
Mark scheme (c)
Scheme
Marks
AO
\(T_A\) will be the larger, so the first to exceed \(6W\) so need to use \(T_A = 6W\) (e.g. by M(\(B\)) but they may use two equations) to form an equation in \(k\) only.
M1: Realise that the first to break will be the rope at \(A\) and complete method to form an equation in \(k\) only (allow uncancelled \(W\)’s) using \(T_A = 6W\). Require all terms (in all equations used). Dimensionally correct. Condone sign errors. M0 if they use \(T_B = 6W\) to find \(k\) (this gives \(k = 9.5\))
A1: Unsimplified equation or inequality in \(k\) only with at most one error
A1: Correct unsimplified equation or inequality in \(k\) only
The lamina \(L\), shown in Figure 2, consists of a uniform square lamina \(ABDF\) and two uniform triangular laminas \(BDC\) and \(FDE\). The square has sides of length \(2a\). The two triangles are identical.
The straight lines \(BDE\) and \(FDC\) are perpendicular with \(BD = DF = 2a\) and \(DC = DE = a\). The mass per unit of area of the square is \(M\). The mass per unit area of each triangle is \(3M\). The centre of mass of \(L\) is at the point \(G\).
(a) Without doing any calculations, explain why \(G\) lies on \(AD\). (1)
(b) Show that the distance of \(G\) from \(D\) is \(\dfrac{\sqrt{2}}{2}a\) (7)
The lamina \(L\) is freely suspended from \(B\) and hangs in equilibrium.
(c) Find the size of the angle between \(BE\) and the downward vertical. (3)
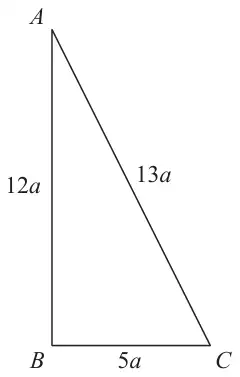
A thin uniform rod, of total length \(30a\) and mass \(M\), is bent to form a frame. The frame is in the shape of a triangle \(ABC\), where \(AB = 12a\), \(BC = 5a\) and \(CA = 13a\), as shown in Figure 1.
(a) Show that the centre of mass of the frame is \(\dfrac{3}{2}a\) from \(AB\). (4)
The frame is freely suspended from \(A\). A horizontal force of magnitude \(kMg\), where \(k\) is a constant, is applied to the frame at \(B\). The line of action of the force lies in the vertical plane containing the frame. The frame hangs in equilibrium with \(AB\) vertical.
M1: Complete strategy to find \(d\) e.g. moments about \(AB\) or a parallel axis. Needs all relevant terms. Must be dimensionally correct. Condone sign errors. \(M\)'s might cancel from the start.
A1: Unsimplified equation with at most one error
A1: Correct unsimplified equation
A1*: Obtain the given answer from a convincing argument
Mark scheme (b)
Scheme
Marks
AO
Complete strategy to find \(k\), e.g. by use of a moments equation
M1
3.1b
\(Mg \times \dfrac{3}{2}a = kMg \times 12a\)
A1
1.1b
\(k = \dfrac{1}{8}\)
A1
1.1b
(3)
(7 marks)
Notes
M1: Complete strategy to find \(k\) e.g. moments about \(A\). Needs all relevant terms. Must be dimensionally correct. Condone sign errors. Condone if \(a\), \(M\), \(g\) missing throughout