
D1 June 2015 Q3
3.
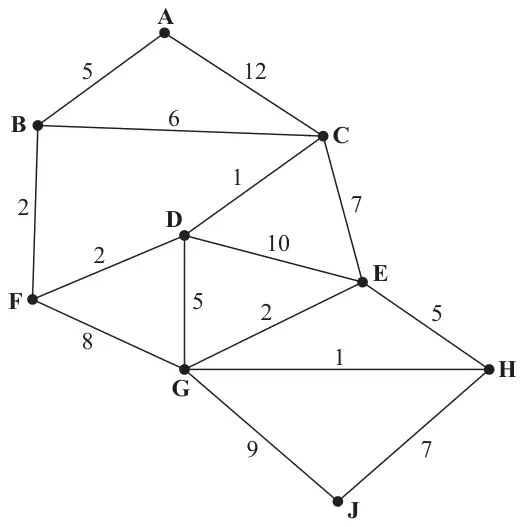
Figure 3 represents a network of roads. The number on each arc is the length, in km, of the corresponding road.
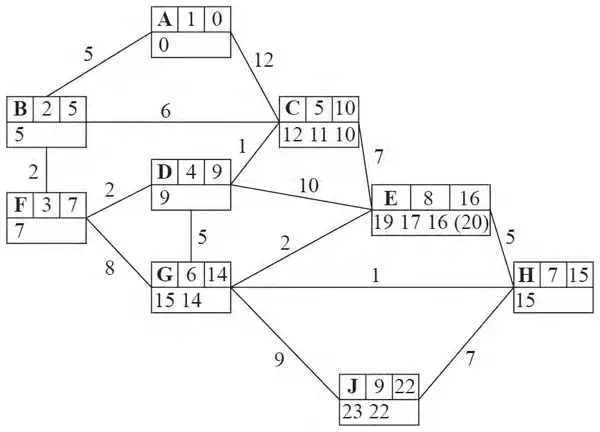
| Scheme | Marks |
|---|---|
| M1 A1 (ABFDC) A1 (GH) A1ft (EJ) | |
| Shortest route: A – B – F – D – G – H – J | A1 |
| Length: 22 (km) | A1ft |
| (6) |
Notes
In (a) it is important that all values at each node are checked very carefully – the order of the working values must be correct for the corresponding A mark to be awarded e.g. at C the working values must be 12 11 10 – in that order (12 10 11 is incorrect).
The 20 in brackets in the working values at E is not required but if a candidate does have a value after the 16 then it must be this value only. This value, if present, must also be in the correct place (after the 16). Penalise any other/incorrect working values with the corresponding A mark. Lastly, it is also important that the order of labelling is checked carefully – some candidates start with a label of 0 at A (rather than 1) – which is fine. Also the order of labelling must be a strictly increasing sequence – so 1, 2, 3, 3, 4, … will be penalised once (see notes below) but 1, 2, 3, 5, 6, … is fine. Errors in the final values and working values are penalised before errors in the order of labelling.
a1M1: A larger value replaced by smaller value at least once in the working values at either C or G or E or J
a1A1: All values in A, B, F, D and C correct. The working values at C must be in the correct order. Condone lack of 0 in A’s working value
a2A1: All values in G and H correct and the working values in the correct order. Penalise order of labelling only once per question (G and H must be labelled in that order and G must be labelled after A, B, F, D and C)
a3A1ft: All values in E and J correct on the follow through and the working values in the correct order. Penalise order of labelling only once per question (E and J must be labelled in that order and E labelled after all other nodes (excluding J)). Ignore additional working value of 20 at E – so the working values may read 19 17 16 20 – rather than 19 17 16 – which is fine – however 20 19 17 16 is incorrect and loses this mark
To follow through E check that all the working values at E follow from the candidate’s final values from nodes C, D, G and H (in the order that the candidate has labelled these four nodes) and that the final value, and order of labelling, follows through correctly. Repeat this process for J (which will have working values from G and H)
a4A1: CAO for the route (from either A to J or J to A)
a5A1ft: If their answer is not 22 follow through their final value at J (condone lack of units)
| Scheme | Marks |
|---|---|
| E.g. 22 – 7 = 15 JH, 15 – 1 = 14 HG, 14 – 5 = 9 GD, 9 – 2 = 7 DF, 7 – 2 = 5 FB, 5 – 5 = 0 BA Or Trace back from J including arc XY if (Y already lies on the path and) the difference of the final values of X and Y equals the weight of arc XY. | B2, 1, 0 |
| (2) |
Notes
For (b) candidates usually give either a general explanation or a demonstration of how they determined their shortest route. If a candidate gives both a general explanation and a demonstration then mark both and award the best mark (but do not mix the two schemes together)
General Explanation:For the first B mark any indication of ‘working backwards’ or ‘tracing back’ through the network – it must be clear from the candidates explanation that they are considering working backwards through the network but give bod for seeing just the phrase ‘working backwards’ (oe)
For the second B mark we must see
- Working backwards from J
- Including an arc (XY) if the difference of the final values (of X and Y) is equal to the weight (of the arc XY)
Must include all the words in bold (or their equivalent, for example, distance for weight, edge for node,…) – technical language must be correct
Demonstration:For the first B mark we must see two consecutive correct calculations working backwards from J for their network. They do not have to link the corresponding nodes for this first mark, for example, 22 – 7 = 15, 15 – 1 = 14 is sufficient for this mark (also note that 22 – 15 = 7, etc. is equivalent). Condone poor notation for this mark, for example, 22 – 7 = 15 – 1 = 14… is fine for B1
For the second B mark we must see all the correct calculations (so no follow through) from J to A and the linking of all arcs/nodes to these calculations, for example, J: 22 – 7 = 15 H, H: 15 – 1 = 14 G, etc. is acceptable. All values (including the 22 and 0) and nodes (including J and A) must be present
| Scheme | Marks |
|---|---|
| Shortest route: A – B – F – D – G – E – G – H – J | B1 |
| Length: 26 (km) | B1 |
| (2) | |
| (10 marks) |
Notes
c1B1: CAO shortest route (A – B – F – D – G – E – G – H – J)
c2B1: CAO correct length (26) – condone lack of units